[Music]
welcome to one of our alfa laval
360 degrees service and maintenance
videos with alfa laval service you
maximize the reliability and uptime of
your equipment
the result is superior performance
throughout the lifecycle of your
equipment performance that puts you
ahead of the competition here we will
focus on how to conduct service and
maintenance on the standard Alfa Laval
TJ 40 G rotary jet head using our
service kit with genuine Alfa Laval
spare parts timely replacement of wear
parts prevents costly damage follow the
instruction manual regarding maintenance
intervals and the use of service kits
remember always read the instruction
manual thoroughly to make sure you cover
all maintenance steps this video only
shows you some of the steps to maintain
the Alfa Laval TJ 40 G rotary jet head
these tools are required each Alfa Laval
service kit contains all the spare parts
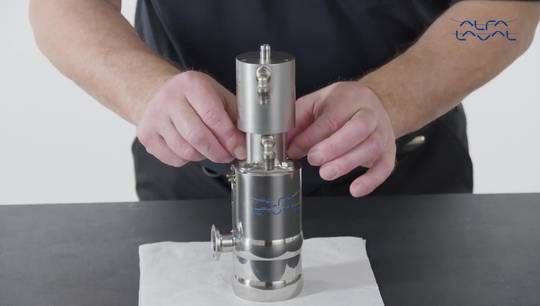
you need how to assemble the Alfa Laval
TJ 40 G rotary jet head first went the
surface of the o-ring for the body with
water to ease the assembly mount the
o-ring over the body
mount the hub with a ball retainer and
hub nut into the body that houses the
hub screw in the hub nut almost all the
way note the left-hand thread
move the o-ring from the body into the
o-ring groove on the body
tighten the hub nut to the body using a
caliper make sure the o-ring is properly
positioned in the o-ring groove
titin to metal-to-metal stop it is
important that no lubricants or Loctite
are used
now fasten the machine in a bench vise
to protect the surfaces always use soft
jaws insert the gearing into the body it
may be necessary to rotate the gearing
to make sure the holes fit with the
thread holes in the body
insert the three screws for the body
farsan using torque values according to
the instruction manual
next insert the stem into the body
place the ball retainer with balls
around the stem
place the stem nut around the stem and
tighten the stem nut into the body using
a caliper
place the o-rings around the stem and on
top of the stem
you
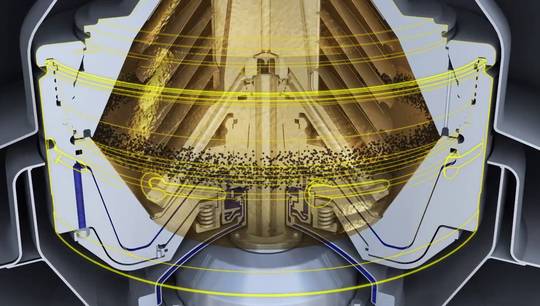
insert the planet gear assembly into the
stem and onto the gear ring it may be
necessary to wiggle the Machine a little
to get the planet gear assembly properly
positioned insert the impeller assembly
into the planet gear assembly rotate the
impeller by hand to ensure that it
rotates freely mount the guide assembly
onto the top of the stem
wet the surface of the stem Oh rings
with water to ease assembly mount the
cone over the guide assembly
catch the thread on the stem and tighten
the cone onto the stem
titin to metal-to-metal stop it is
important that no lubricants or Loctite
are used
now remove the machine from the bench
vise
wet the surface of the nozzle Oh rings
with water to ease assembly mount the
nozzles with a rings into the hub
make sure the o-rings are properly
positioned in the o-ring grooves
tighten to metal-to-metal stop
after assembly check that the turbine
rotates freely using a socket wrench at
the top of the turbine turn it
counterclockwise while holding the
machine by the cone the hub with nozzles
should rotate very slowly
[Music]